
The Caverns are a set of areas you unlock through The Hole in World 5 of IdleOn. Each Cavern has a different function and it's own mechanics that provide bonuses, resources and more for your IdleOn account.
- The Well - Cavern I
- The Motherlode - Cavern II
- The Dawg Den - Cavern III
- The Bravery Monument - Cavern IV
- The Bell - Cavern V
- The Harp - Cavern VI
- The Lamp - Cavern VII
- The Hive - Cavern VIII
- The Gloomie Grotto - Cavern IX
- The Justice Monument - Cavern X
- The Jar - Cavern XI
- The Evertree - Cavern XII
- The Wisdom Monument - Cavern XIII
- The Gambit - Cavern XIV
- The Sactum Temple - Cavern XV
In order to unlock the different Caverns, you need to Level Up your Explorer Villager from The Hole. As mentioned in The Hole article, a villager gains EXP over time based on how many Opals they have invested in them.
There are a total of 15 Caverns to unlock. You can find your Caverns by clicking on the hole area at the map Smolderin Plateau / The Hole.
The Well - Cavern I

The first Cavern you unlock is called The Well. Here you will obtain rock resources over time by filling up your buckets.
Each bucket you have can be assigned to collect resources from a different layer of The Well. In order to reveal the different levels of resources, you need to first remove the Rock Layer by assigning your buckets to collect the rocks from that layer.
You can unlock more Buckets via the Engineer Villager at The Hole.
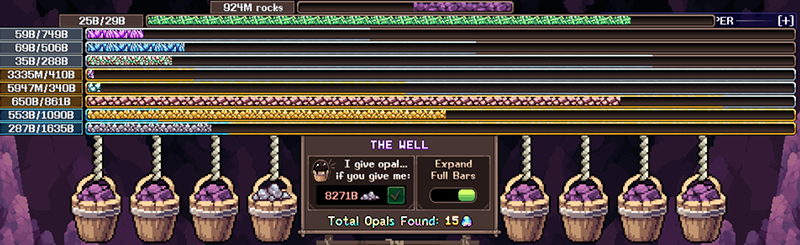
When you unlock the Engineer Schematic Bar Expand-o-rama you can then expand any full bar so you can hold more of that rock. Expanding will reset your rock resources to 0.
Selecting the option to Auto-Expand will automatically expand the bar when it is full (and also resetting your rock resources to 0).
You can also earn Opals by spending your Gravel resource at The Well. Each time you purchase an Opal, the amount of Gravel needed for the next opal is increased.
There are currently a total of 10 different layers from the well you can collect from:
| Resource | Rock Layer | Amount Of Rock To Remove |
|---|---|---|
 Gravel |
1 | 0 |
 Goldust |
2 | 50 |
 Redstone |
3 | 500 |
 Mythril |
4 | 9000 |
 Colbaltine |
5 | 125,000 |
 Bruntine |
6 | 1,500,000 |
 Freezium |
7 | 20,000,000 |
 Sweetium |
8 | 100,000,000 |
 Rad Coral |
9 | 500,000,000 |
 Hyper Coral |
10 | 2,000,000,000 |
You can also gain the following based on The Well resources you have:
| Name | Bonus | From |
|---|---|---|
 DNA Rock Tumbler |
Gives you a +60% chance to get an additional Grey Gene when trashing a pet for every Power of 10 Gravel you have. | Engineer Villager (The Hole) |
 True Golden Edge |
Gives all your players +20% Damage for every Power of 10 Golddust you have. | Engineer Villager (The Hole) |
 Heavy Redstone Seasoning |
Gives you a multiplicative 1.30x Cooking Speed bonus for every Power of 10 Redstone you have. | Engineer Villager (The Hole) |
The Well Boosts
To help boost The Well Cavern, you can unlock various bonuses throughout The Hole.
| Name | Bonus | From |
|---|---|---|
 Better Buckets |
Increases the base fill rate of all Well Buckets from 10/hr to 15/hr. IMPORTANT:You can click on the buckets for more info! | Engineer Villager (The Hole) |
 Loadin' some 'Lode |
Gives +5 Bucket Fill Rate per Power of 10 Motherlode Ore mined. You have mined # so far! | Engineer Villager (The Hole) |
 Hiring the Hounds from Beyond |
Gives +10 B.F.R. per 100 hounds defeated in best runs of each class. | Engineer Villager (The Hole) |
 Bar Expand-o-rama |
Adds the 'Expand Full Bars' toggle to the Well! Let me explain... when a bar is full of sediment, you lose half of the sediment, but permanently increase the max by 1.50x! | Engineer Villager (The Hole) |
 2nd Bucket! |
Adds another bucket at the Well! You'll need to expand your Gravel bar to hold the 130 needed to create this! | Engineer Villager (The Hole) |
 Motherlode ~ Bucket Synergy |
Gives all your buckets 1.10x fill rate per Motherlode Layer you've destroyed! | Engineer Villager (The Hole) |
 Expander Extravaganza |
Gives all your buckets +20% Fill Rate per bar expansion across all sediment types! This includes Uber expansions later! | Engineer Villager (The Hole) |
 Even Better Buckets |
Increases the base fill rate of all Well Buckets from 15/hr to 20/hr. Try changing your bucket to remove the rocks, once you remove that layer you can collect gold dust! | Engineer Villager (The Hole) |
 3rd Bucket! |
Adds another bucket at the Well! Remember, click a bucket to change what sediment it collects! That's how you get this gold resource! | Engineer Villager (The Hole) |
 UBER Bar Expand-o-rama-hala |
Allow for UBER Full Bar Expansion, which means you can expand Well Bars beyond the previous limit of 14 times. | Engineer Villager (The Hole) |
 4th Bucket! |
Adds yet another bucket at the Well! | Engineer Villager (The Hole) |
 Five Nights at Bucket |
Adds one more bucket at the Well! Five buckets!!! WOW! That's worth writing home about! | Engineer Villager (The Hole) |
 6th Bucket! |
Adds another bucket at the Well! I guess 5 wasn't enough for a go getter like yourself! | Engineer Villager (The Hole) |
 7rth Barckot?! |
Adds another bucket at the Well! You DO want more buckets, right? | Engineer Villager (The Hole) |
 Last Bucket! |
Adds another bucket at the Well! And it's the last one too, I hope your bucket lust is satiated! | Engineer Villager (The Hole) |
 9th Bucket! |
Adds another bucket at the Well! Yea apparently there were a few more of these left! | Engineer Villager (The Hole) |
 Bucket Finale! |
Adds another bucket at the Well! And yea this one is actually the last one, I don't think an 11th would fit on screen! | Engineer Villager (The Hole) |
| Measure | +% Bucket Fill Rate | Measures |
| Study The Well | You only lose 25% sediment when bar expanding instead of 50% Also, +10% Bucket Fill Rate per Bar Expansion | Studies |
 Violet Violets |
All buckets get 1.2x Bucket Fill Rate! | The Jar |
The Motherlode - Cavern II

The Motherlode is a giant rock that you can Mine.
When you mine the Motherlode, you will reduce the layer bar. When it reaches zero, you can destroy the layer and earn an Opal.
Each time you destroy a layer, the Mining Efficiency needed increases, as well as how many Ore you need to mine to destroy the next layer.
You can also earn several bonuses from other areas of The Hole based on how many layers of The Motherlode you have destroyed:
| Name | Bonus | From |
|---|---|---|
Loadin' some 'Lode |
Gives +5 Bucket Fill Rate per Power of 10 Motherlode Ore mined. | Engineer Villager (The Hole) |
Motherlode ~ Bucket Synergy |
Gives all your buckets 1.10x fill rate per Motherlode Layer you've destroyed! | Engineer Villager (The Hole) |
 Motherlode Trickledown |
+15% All Skill Efficiency, and +10% All Skill EXP gain per Motherlode Layer you've destroyed! | Engineer Villager (The Hole) |
| Motherlode | Every layer destroyed lowers the resources needed to destroy other skilling caverns by 2% | Study |
 Amethyst Heartstone |
All skilling caverns require 10% less Resources to get opals! | The Jar |
The Dawg Den - Cavern III

The Dawg Den is where you fight waves and waves of hounds that get progressively stronger and stronger.
The hound mobs will incite fear the longer they stay on the map; when your fear bar is full it is game over.
You'll earn 1x Opal once you reach a certain score.
You can increase how many points you earn per kill based on Amplifiers. Amplifiers are unlocked through the Engineer Schematics.
Each Amplifier can be increased up to 100 times by clicking on it, which affects your overall Score Multiplier.
Amplifiers
Below you can find all the Amplifiers, all of which can be unlocked from the Engineer Villager at The Hole.
| Name | Amplifier |
|---|---|
 Bigger Bite |
Hounds now have a base attack value of 5k |
 Elusive Instinct |
Hounds now require 6K Accuracy for 100% hit chance |
 Canine Recovery |
All hounds now heal 0% HP every 3s |
 Bigger Bow Wow |
Hounds have a 10% chance to spawn BIG with 1x HP and DMG |
 Doggo Emp Effect |
Somehow the hounds now make your attacks cost 1x more MP |
 Cursed Howl |
Hounds have a 5% chance to be cursed, causing 1x more Fear |
 Den Despair |
Start with your fear meter filled to 0% |
 Fast And Deadly |
Hounds cause fear 0 seconds faster than normal |
The Den Boosts
Based on how much you progress in The Den, you can also gain these boosts:
| Name | Bonus | From |
|---|---|---|
Hiring the Hounds from Beyond |
Gives +10 B.F.R. per 100 hounds defeated in best runs of each class. | Engineer Villager (The Hole) |
| The Den | Defeating the Golden Hound gives a 5x score multi and spawns another Golden Hound! | Study Villager (The Hole) |
The Bravery Monument - Cavern IV

The Bravery Monument is a mini-game that unlocks several account-wide bonuses that stack each time you play.
The Bravery Monument also has several boosts that you unlock by AFKing at the Monument (you can't use Time Candies!).
When you click the Tell Me A Story, you'll have to use your Swords to deal damage. Each Sword can roll a minium~maximum amount of damage. If you defeat the round, you can select one of three bonuses.
If you lose the round, you'll lose any bonuses you have selected for that mini-game play. If you select Run Away, the bonuses are permanently added to your account!
Re-throws allow you to re-throw a sword, however, they will reduce your min-max damage bonus.
Retelling allows you to restart the entire level with all previous bonuses in tact (including Rethrows + min-max damage).
AFK Boosts
The following Bravery Bonuses can be unlocked by AFKing:
| Bonus | AFK Hours |
|---|---|
| Swords deal min~max damage | 1 |
| +2 additional Sword | 80 |
| You can Re-Throw 5 swords per story | 300 |
| +1 additional Sword | 750 |
| You get 1 Retelling per story | 2,000 |
| +1 additional Sword | 5,000 |
| +10 Re-Throws per story | 10,000 |
| +1 additional Sword | 24,000 |
Bravery Stats
Below you can find all the Bonuses that you can gain from playing the Bravery Monument.
| Stat | Round |
|---|---|
| +% Mining Efficiency 0 | 1 |
| x Bucket Fill Rate 1 | 1 |
| x Cooking Speed 2 | 1 |
| +% EXP Gain for Villagers 3 | 3 |
| x Gaming Bits Gain 4 | 5 |
| +% Chance for Bravery Opals 5 | 9 |
| +% DMG for all Characters 6 | 13 |
| x Bell Ring & Ping Rate 7 | 17 |
| + % All Monument AFK Gain | 32 |
| x Bravery Bonuses Multi | 47 |
Bravery Monument Bonuses
You can enhance the Bravery Monument with these bonuses:
| Name | Bonus | From |
|---|---|---|
 The Story Changes Over Time.. |
Bravery Swords get +1 minimum DMG and +10 maximum DMG per 6 HR of AFK time at the Bravery Monument! | Engineer Villager (The Hole) |
 First Try, I swear! |
If you throw the LAST bravery sword first, and it kills the monster, you get a +10% Sword Max DMG bonus for the rest of the story. If it doesn't kill, this bonus resets back to 0% | Engineer Villager (The Hole) |
 Reroll Keeper |
Each unused reroll you have in a Bravery Story gives +10% Sword Max DMG. So don't be all loosey goosey with those rerolls! | Engineer Villager (The Hole) |
| Measure | +% Bravery Sword Max Dmg | Measure |
| Study Bravery | Minimum DMG is at least 3% of Max, and you now skip trivial fights! | Study |
 Minecraft Gem |
+20% Monument AFK Gain rate. | The Jar |
The Bell - Cavern V

The Bell cavern presents a giant bell that you can ring for various bonuses.
There are several options for the Bell:
- Ring Bell - Gives +1 level of a random bonus
- Ping Bell - Gives an Opal
- Clean Bell - Clean the bell to unlock an Improvement Method
- Renew Bell - Resets all bonuses but you keep improvement methods and opals earned
You can only ring a bell once it's meter has filled up. You can only charge one bell at a time; once it reaches 100%, it will then continue to charge so you can ring it potentially multiple times.
Ringing Bell
The following bonuses are available to level up when using the Ringing Bell option:
- +% Bucket Fill Rate
- +% All Villager EXP Rate
- +% Harp Note Gains
- +% Daily Lamp Wishes
- +% Extra Ruper Chance
- +% Double Torch Chance
Cleaning Bell
The following Improvement Methods can be unlocked by cleaning the bell, which can be further upgraded using a specific resource.
| Boost | Resource |
|---|---|
| +% Bell Ring | Money |
| +% Bell Ping | Notes (The Harp) |
| +% Bell Clean | Cobalite (The Well) |
| +% Bell Ring | Atoms |
| +% Bell Ring | Gaming Bits |
| +% Bell Ring | Rubies (The Jar) |
The Bell Bonuses
You can enhance The Bell with these bonuses:
| Name | Bonus | From |
|---|---|---|
 Double Dinger Ringer |
Ringing the Bell now has a +30% chance of giving +2 LV to a bonus, instead of just +1 LV | Engineer Villager (The Hole) |
 Improvement Stackin' |
For every 25 LVs across all Improvement Methods upgrades at the Bell, all your Improvement Method bonuses are 1.10x higher! | Engineer Villager (The Hole) |
 RNG Oxidizing Layer |
When you Clean the Bell and FAIL to get a new Improvement Method, the success chance for next time goes up by 1.25x. This happens every fail, and resets when you finally succeed! | Engineer Villager (The Hole) |
 Triple Tap Tinkle |
Ringing the Bell now has another +30% chance of giving +2 LV to a bonus instead of just +1 LV. Also, there's a new +20% chance of giving +3 LV instead of +2 or +1! | Engineer Villager (The Hole) |
 All This Ringing in my Ears |
When Ringing the Bell, there is now a 25% chance to get 2x more LVs than you otherwise would have gotten! | Engineer Villager (The Hole) |
| Measure | +% Bell Ring & Ping Rate | Engineer Villager (The Hole) |
| The Bell | Every 20th Bell Ring gives a random bonus +20 LVs. Biiig Ring baby! | Study |
| Bravery Bonus | x Bell Ring & Ping Rate | Bravery Monument |
 Big Beef Rock |
1.25x faster Bell Ring Rate! | The Jar |
 Twisted Rupie |
1.75x faster Bell Ring Rate! | The Jar |
The Harp - Cavern VI

The Harp allows you to earn a variety of note resources that can be used to upgrade various bonuses within The Hole.
When the Harp Power is charged (over time), you can then pluck the strings on The Harp to earn the note resources.
Each String can be adjusted to a different note, with each Note giving various bonuses.
You can also tune The Harp to learn different note resources that are earned when plucking the strings.
Harp Notes
Each Harp Note resource can be learned by purchasing it from The Harp NPC.
| Note | Cost |
|---|---|
 Crotchet Note |
Default |
 Natural Note |
x150 |
 Bass Note |
x1.9K |
 Treble Note |
x15.8K |
 Eighth Note |
x109.4K |
 Quaver Note |
x687.7K |
 Sharp Note |
x4.1M |
 (F) Clef Note |
x23.1M |
 (G) Clef Note |
x126.8M |
 Sixteenth Note |
x681M |
String Adjustments
Each Note that you have learned can be assigned to each string of The Harp. You learn the different note types from the Engineer Villager.
When a note is plucked, it will gain EXP based on your Harp Power.
| Note String | Description | Level Bonus |
|---|---|---|
| C | Creates x of the note you're tuned to! | +% Harp Note Gain |
| D | Has a % chance of finding an Opal | x Harp Note Gain |
| E | Doesn't do anything... but its LV bonus is freakin' epic! | x Harp Power/hr |
| F | Creates x of the tune,and notes next to the tune! | +% Harp Note Gain |
| G | Gives x EXP to all string types! | +% String EXP Gain |
| A | Creates x of every note you know! | +% Harp Note Gain |
The Harp Bonuses
You can enhance The Harp with these bonuses:
| Name | Bonus | From |
|---|---|---|
 Loaded Harp |
Adds +1 more string to the Harp, ready to be strummed until the end of (the) time (signature)! | Engineer Villager (The Hole) |
 Eee String |
Permanently unlocks a new String Type for the Harp! You can level it up by plucking it, getting +1 EXP per 100% Harp Power! | Engineer Villager (The Hole) |
 Packed Harp |
Adds +1 more string to the Harp, you'll find it right next to all your other strings! | Engineer Villager (The Hole) |
 Domino Effect |
Strings give +20% more per string plucked during a strum... let me explain. Imagine you have 5 strings, this would mean the final string you pluck would be worth DOUBLE! | Engineer Villager (The Hole) |
 Fractalfly ~ Harp Synergy |
Boosts your Harp Note production by 1.10x per Undying Hive Layer you've destroyed! | Engineer Villager (The Hole) |
 Eff String |
Permanently unlocks a new String Type for the Harp! You can level it up by plucking it, getting +1 EXP per 100% Harp Power! | Engineer Villager (The Hole) |
 Geez String |
Permanently unlocks a new String Type for the Harp! You can level it up just like any other string, getting +1 EXP per 100% Harp Power! | Engineer Villager (The Hole) |
 Hefty Harp |
Adds +1 more string to the Harp, it even makes sound when strummed! The other ones do too, but like, this one does too! Just incase you were worried it wouldn't. | Engineer Villager (The Hole) |
 Variety Effect |
Strings give +30% more for each unique string type on your harp... I see you currently have $ different strings on your harp, so your strings are all worth #% more! | Engineer Villager (The Hole) |
 Multitudinal Harp |
Adds +9999 more strings to the Harp! Haha nah just +1 string, figured I'd keep you on your toes! If I tricked you, you must go pluck the F string. | Engineer Villager (The Hole) |
 Aye String |
Permanently unlocks a new String Type for the Harp! You can level it up just like any other string! | Engineer Villager (The Hole) |
 Sumptuous Harp |
Adds +1 more string to the Harp... all these strings really remind me of string cheese, I used to love it! | Engineer Villager (The Hole) |
All This Ringing in my Ears |
When Ringing the Bell, there is now a 25% chance to get 2x more LVs than you otherwise would have gotten! | Engineer Villager (The Hole) |
| String is Strung | Adds 1 more string to your harp, cluck it with pride! Err, pluck it. I'm not a chicken that was just a typo!! | Hole Majik |
| Measure | +% Harp Note Gain | Measure |
| Measure | +% Harp String Exp | Measure |
| Measure | +% Harp Note Gain | Measure |
| The Harp | All strings give 2x EXP, and have a 1% chance of getting a massive 100x EXP multi | Study |
 Crimson Spade |
The harp produces 1.2x more Notes! | The Jar |
The Lamp - Cavern VII

Each day at The Lamp you gain a wish (which can be increased by a variety of bonuses in The Hole).
When you Wish for More Wishes, you will unlock a brand new Wish you can upgrade. The cost of upgrading Wishes scales differently for each one.
The following Wishes are available:
| Wish | Initial Cost | Increase Per Wish | Description | Unlock Wish Cost |
|---|---|---|---|---|
| More Wishes | 1 | Your wish is my command... wait stop no you can't just wish for more wishes!! | 4 | |
| Another Try | 6 | 0 | That sounds like a fair request, what exactly would you like another try at? @ | 1 |
| 1000000 Opals | 4 | 1 + (2 * wishes + pow(wishes, 1.7))) | A million opals??!? M'lord please, lets be reasonable here! I can give to you but one opal... | 4 |
| Bring Them Back | 2 | wishes * 0 + 2 | I'm sorry, I can't do this... it wouldn't be right. @ But I can grant 12 hours of respect, to whom should it go? | 9 |
| World 4 Stuff | 1 | wishes * .2 + 1 | Uhh, sure, how about these bonuses: @ +{% Cooking Speed @ +}% Shiny Pet LV Up & Breedability Rate @ +~% Lab EXP gain | 16 |
| A Moderate Discount | 2 | wishes * .5 + 2 | A... discount? Just a discount? Thats uh, yea, that is certainly doable m'lord. @ I can grant an additional 15% discount on the next Engineer Schematic creation! | 25 |
| World 5 Things | 1 | wishes * .2 + 1 | Wow very specific! How about: @ +{% Sailing Loot Value @ +}% Bits gain @ +~% Divinity Pts gain | 36 |
| Infinite Resources | 1 | wishes * .05 + 1 | Infinite isn't a number, it's more of a concept... Instead, I'll grant a #x bonus to Well and Harp resource gain! Oh, and $x for Jar Rupie gain! | 49 |
| World 6 Majigers | 1 | wishes * .2 + 1 | Yes yes majigers, how about things like: @ +{% Next Crop chance @ +}% Stealth for Ninja twins @ +~% All Essence gain | 64 |
| Knowledge of Future | 1998 | wishes * 999 + 999 | If I told you what the future was, it wouldn't really be the future anymore would it m'lord? No, you'll have to wait for the future to be the now. | 81 |
| World 7 Stuff | 1998 | wishes * 999 + 999 | Bah, you should start with wishing for World 7 in the first place! We both know it doesn't exist yet! | 100 |
| World 8 Stuff | 1998 | wishes * 999 + 999 | Oh please, World 8? Is this 'World 8' in the room with us right now? M'lord, you waste both our time! | 121 |
The Lamp Bonuses
You can enhance The Lamp with these bonuses:
| Name | Bonus | From |
|---|---|---|
| Wishy Washy | +30% chance to get an additional Wish every day at the Lamp! | Hole Majik |
| Measure | +% Daily Lamp Wishes | Measure |
| The Lamp | Get 1 more lamp wishes every day. No, you can't wish to change this! | Study |
| Ringing The Bell | +% Daily Lamp Wishes | The Bell |
The Hive - Cavern VIII
The Hive is Cavern 8 and is another "skilling cavern". You need to use your Catching Skill to remove different levels.
You will get 1 Opal per Hive destroyed, with the Catching Efficiency requirement increasing for every level you beat.
You can also earn several bonuses from other areas of The Hole based on how many layers of The Hive you have destroyed:
| Name | Bonus | From |
|---|---|---|
Fractalfly ~ Harp Synergy |
Boosts your Harp Note production by 1.10x per Undying Hive Layer you've destroyed! | Engineer Villager (The Hole) |
 Fractalfly Trickledown |
+15% All Skill Efficiency, and +10% All Skill EXP gain per Undying Hive Layer you've destroyed! | Engineer Villager (The Hole) |
| The Hive | Every hive harvested lowers the resources needed to destroy other skilling caverns by 5% | Study |
The Gloomie Grotto - Cavern IX

The Gloomie Grotto cavern requires you to defeat a specific amount of Gloomie mobs in order to challenge the Grotto boss, known as The Monarch.
Gloomies will spawn periodically in the Cavern, with each kill reducing the kill count required to fight the boss.
Once you defeat the boss, you'll be given an Opal and move onto the next round, where the amount of Gloomies to kill increases.
Bonuses
These bonuses are also available based on your progress in the Gloomie Grotto:
| Name | Bonus | From |
|---|---|---|
 Gloomie Lootie |
+5% Drop Rate for each Colony of Gloomie Mushrooms defeated! Drop rate here as in like, the one for stuff outside of the Caverns. | Engineer Villager (The Hole) |
 Gloomie Expie |
+25% Class EXP gain for each Colony of Gloomie Mushrooms defeated | Engineer Villager (The Hole) |
 Gloomie Opie |
+10% Villager EXP gain for each Colony of Gloomie Mushrooms successfully romanced... or defeated, whichever is higher. | Engineer Villager (The Hole) |
 Gloomie Mulch |
Gloomie mushrooms respawn +10% faster! In fact, ALL monsters across all the worlds of IdleOn respawn +10% faster! | Engineer Villager (The Hole) |
| Measure | +% Multikill Per Tier | Measure |
| Grotto | Each Gloomie kill counts for x more toward challenging the Monarch | Study |
The Justice Monument - Cavern X

The Justice Monument is another mini-game you can play each day where you can gain permanent account-wide bonuses.
The mini-game involves you playing out a series of scenarios where you must either Accept, Reject or Dismiss.
You have four stats to keep an eye on:
- Mental Health
- Coins
- Popularity
- Dismissals
If you end up with 0 Mental Health, it's game over.
Every 5 levels, the Grim Reaper appears and asks you to pay a fine. If you reject his request, you'll lose a Mental Health. There are also other requests that can do the same.
Rewards come in the form of Treasure Chests, which you can earn through several of the scenarios available in the game. Once you get Game Over, you'll be able to open all of the chests you have earned.
AFK Boosts
You can unlock several Monument bonuses by AFKING in the Cavern:
| Bonus | AFK Hours |
|---|---|
| Start with 58 coins | 1 |
| Start with 2 Mental Health | 80 |
| You can Dismiss 1 case per story | 300 |
| Start with 1.5x more coins | 750 |
| +1 Mental Health and Dismissal | 2,000 |
| Start with 10 popularity | 5,000 |
| Start with 3x more coins | 10,000 |
| +2 Mental Health and Dismissals | 24,000 |
Justice Stats
Below you can find all the Bonuses that you can gain from playing the Justice Monument.
| Stat | Round |
|---|---|
| +% Catching Efficiency | 1 |
| x Harp Note Gain | 1 |
| x Artifact Find Chance | 1 |
| +% EXP Gain for Villagers | 8 |
| x All Summoning Essence Gain | 17 |
| +% Chance for Justice Opals | 27 |
| +% Class EXP Gain | 33 |
| +% more daily Lamp Wishes | 49 |
| + % All Monument AFK Gain | 52 |
| x Justice Bonuses Multi | 77 |
Justice Monument Bonuses
These bonuses can also help you with the Justice Monument game:
| Name | Bonus | From |
|---|---|---|
 Compound Interest |
You start with +1 more Court Coins every Power of 2 HRs of AFK time at the Justice Monument! So 2Hrs you get +1 coin, 4Hrs you get +2 coins, 8Hrs you get +3 coins, and so on! | Engineer Villager (The Hole) |
| Monumental Vibes | All of your Monument Bonuses are 1.25x higher! 9 out of 10 monument enjoyers recommend this bonus! | Hole Majik |
| Justice | Justice Reward Multi goes up 100% every day for +14 more days! Also, }x chance for opal reward! | Study |
| Measure | +% Monument Afk Rate | Measure |
Minecraft Gem |
+20% Monument AFK Gain rate. | The Jar |
The Jar - Cavern XI

The Jar allows you to collect special rupies that you can spend on various upgrades in The Hole. There are also several other account-wide bonuses to unlock by collecting "collectable" rupies.
The Jar will generate jars over time that you can break to collect their rewards. You can select the type of Jar you wish to generate depending on your purpose. Jars unlock as you earn more rupies.
Unlocking the Engineer Schematic Jar Production Line will lower the amount of time a Jar is needed to be created based on how many on the previous Jar you have broken.
You can produce multiple jars at once by unlocking Engineer Schematics.
Jar Types
| Jar | Description | Unlock | Generates |
|---|---|---|---|
| Simple Jar | Contains a random basic rupie | Default |    |
| Tall Jar | Has a % chance to contain an Opal | 50 |
Opal |
| Ornate Jar | Has a % chance to contain a new collectible | 678 |
Collectible |
| Great Jar | Contains a random decent rupie | 5,985 |
   |
| Enchanted Jar | Has a % chance to enchant a collectible doubling its bonus | 44,236 |
Enchant Collectible |
| Artisan Jar | Contains a white rupee | 296,749 |
 |
| Epic Jar | Contains a random elegant rupie | 1,872,419 |
   |
| Gilded Jar | Doubles the amount of rupies from the next jar opened | 11,325,685 |
Doubles your rubies from jars |
| Ceremony Jar | Contains a dark rupie | 66,419,200 |
 |
| Heirloom Jar | Contains the one and only master rupie | 380,420,285 |
 |
Jar Collectibles
Collectibles can be found from Jars that give boosts to your Jar Production and other caverns.
You can find Collectibles from the Ornate Jar, and also enchant a Collectible using the Enchanted Jar.
| Collectible | Bonus |
|---|---|
 Abnormal Rupie |
Rupies found are worth +20% more |
 Sapphire Droplet |
Jar production rate is +10% faster |
 Effervescent Diamond |
1.2x higher chance to find Opals in Tall Jars. |
 Tortole Rock |
All rupies found are worth a whopping 1.25x more! |
 Natural Pearl |
All villagers gain +15% more EXP. |
Amethyst Heartstone |
All skilling caverns require 10% less Resources to get opals! |
 Amber Square |
Rupies found are worth +25% more |
 Verdant Thorns |
1.25x higher chance to find new Collectibles |
Violet Violets |
All buckets get 1.2x Bucket Fill Rate! |
 Blue Faberge Egg |
1.15x higher chance to enchant a Collectible |
 Shadow Prism |
All villagers gain +20% more EXP. |
Big Beef Rock |
1.25x faster Bell Ring Rate! |
 Emerald Ore |
All villagers gain +30% more EXP |
 Dawn Prism |
Rupies found are worth +30% more. |
 Swampstone |
1.25x higher chance to find Opals in Tall Jars. |
 Frost Spirestone |
Jar production rate is +12% faster. |
 Rosemerald |
1.1x Faster study rate for villager Bolaia |
 Blood Glass |
All rupies found are worth a whopping 1.40x more! |
 Sunrise Diamond |
1.25x higher chance to enchant a Collectible |
Minecraft Gem |
+20% Monument AFK Gain rate. |
Crimson Spade |
The harp produces 1.2x more Notes! |
 Stained Glassdrop |
Rupies found are worth +35% more. |
 Tabula Rasastone |
All villagers gain +32% more EXP. |
 Deep Blue Square |
+1% Gambit PTS |
 Earthbound Geode |
Jar production rate is +15%faster. |
 Inferno Droplet |
1.4x higher chance to find new Collectibles. |
 Octogonal Gem |
1.3x higher chance to enchant a Collectible |
 Solarfang |
1.32x higher chance to find Opals in Tall Jars. |
 Mystic Ore |
All rupies found are worth a whopping 1.5x more! |
 Arcane Prism |
All villagers gain +38% more EXP. |
 Murky Fabrege Egg |
+1% Gambit PTS |
 Corpore Rock |
Boosts_a_future_cavern..._futuuure..! |
 Twilight Prism |
Boosts_a_future_cavern..._futuuure..! |
 Tewball Orbstone |
Rupies found are worth +40% more |
 Mad Muscle Rock |
1.4x higher chance to enchant a Collectible |
 Sunroot Splinters |
All villagers gain +40% more EXP. |
Twisted Rupie |
1.75x faster Bell Ring Rate! |
 Overloaded Relic |
Boosts_a_future_cavern..._futuuure..! |
 Sunburst Pearl |
Boosts_a_future_cavern..._futuuure..! |
 Bloodfang Spires |
Boosts_a_future_cavern..._futuuure..! |
The Jar Upgrades and Bonuses
The Jar can be upgraded through a variety of methods and also gives extra bonuses for other areas:
| Name | Bonus | From |
|---|---|---|
 Big Jar Mach II |
Upgrades the main jar, doubling the base value of every rupie you find. So if you see 2 red rupies, you actually got 4! | Engineer Villager (The Hole) |
 Supergiant Jars |
Jars now COMBINE to save space! 10 Jars becomes 1 large jar, which gives 10x rewards. 10 large jars become 1 giant jar, which gives 100x rewards. This continues forever! | Engineer Villager (The Hole) |
 Evertree ~ Rupie Synergy |
Boosts overall Rupie value by 1.10x per Evertree Trunk you've whittled! | Engineer Villager (The Hole) |
 Break All Button |
Adds a new button to the top left of the Jar, allowing you to break all jars at once! | Engineer Villager (The Hole) |
 Big Jar Mach III |
Upgrades the main jar, allowing you to produce 2 jar types at once! | Engineer Villager (The Hole) |
 Jar Production Line |
The requirement to make a jar is 5% lower per POW 10 jars made of the previous type. For example, making 100 Simple Jars would mean Tall jars are 10% quicker to make! | Engineer Villager (The Hole) |
 Big Jar Mach IV |
Upgrades the main jar, increasing the chance for multiple rupies in a jar by +50% | Engineer Villager (The Hole) |
 Collect 'Em All |
Gives a 1.02x chance to find a new collectible for every digit of all the rupies you own. | Engineer Villager (The Hole) |
 Big Jar Mach V |
Upgrades the main jar, doubling the base value of every rupie you find AGAIN! If 2 red rupies gave you 4 before, now it's 8!!! | Engineer Villager (The Hole) |
 Light Speed |
Every POW 10 white rupies you own increases the production rate of jars by +10% | Engineer Villager (The Hole) |
 Big Jar Mach VI |
Upgrades the main jar, allowing you to produce 3 jar types at once! | Engineer Villager (The Hole) |
 Dark Luck |
Every POW 10 dark rupies you own increases the chance of enchanting collectibles from the Enchanted Jar by 1.10x | Engineer Villager (The Hole) |
 Big Jar Mach VII |
Upgrades the main jar, reducing the production amount required to make jars by 30% so you can make them faster! | Engineer Villager (The Hole) |
 Advanced Collection |
You can now find new collectible types from jars, found in the new 2nd page of your collection! Go collect 'em all! | Engineer Villager (The Hole) |
 Big Jar Mach VIII |
Upgrades the main jar, doubling the base value of every rupie you find! This does not stack with the other ones... just kidding it totally does! ANOTHER 2x RUPIES!!! | Engineer Villager (The Hole) |
Bababooey |
+% Rupie Value | Measure |
Killermeters |
+% Monument AFK Rate | Measure |
Joules |
+% Jar Produce SPD | Measure |
Meters |
+% Gambit PTS | Measure |
Pixels |
+% Rupie Value | Measure |
Yards |
+% Drop Rate | Measure |
| The Jars | Double click to choose a collectible to be most likely enchanted! Also, x Enchantment Chance! | Study |
The Evertree - Cavern XII

The Evertree is Cavern 12 and is another "skilling cavern". You need to use your Chopping Skill to remove different levels.
You will get 1 Opal per Trunk destroyed, with the Chopping Efficiency requirement increasing for every level you beat.
You can also earn several bonuses from other areas of The Hole based on how many layers of The Hive you have destroyed:
| Name | Bonus | From |
|---|---|---|
Evertree ~ Rupie Synergy |
Boosts overall Rupie value by 1.10x per Evertree Trunk you've whittled! | Engineer Villager (The Hole) |
 Evertree Trickledown |
+15% All Skill Efficiency, and +10% All Skill EXP gain per Evertree Trunk you've whittled! | Engineer Villager (The Hole) |
The Wisdom Monument - Cavern XIII

The Wisdom Monument is another mini-game that you can AFK at to unlock various rewards.
The mini-game is a memory game where you need to match tiles to complete a round. Each round increases the amount of tiles you need to match.
AFK Boosts
You can unlock several Monument bonuses by AFKING in the Cavern:
| Bonus | AFK Hours |
|---|---|
| Start with 26 Attempts | 1 |
| Get +2 Attempts per Board Clear | 80 |
| 1st attempt each Board reveals row | 300 |
| Start with 4 Insta Matches per story | 750 |
| +4 additional Starting Attempts | 2,000 |
| 4th attempt each Board reveals square | 5,000 |
| Get +1 Attempts per Board Clear | 10,000 |
| +5 additional Insta Matches | 24,000 |
Wisdom Stats
Below you can find all the Bonuses that you can gain from playing the Wisdom Monument.
| Stat | Round |
|---|---|
| +% Chopping Efficiency | 1 |
| x Jar Rupie Value | 1 |
| x Jade Coin Gain | 1 |
| +% EXP Gain for Villagers | 10 |
| x Farming Crop Evo chance | 10 |
| +% Chance for Wisdom Opals | 10 |
| +% Player Drop Rate | 10 |
| +% Gambit Points | 10 |
| + % All Monument AFK Gain | 10 |
| x Wisdom Bonuses Multi | 10 |
Wisdom Monument Bonuses
These bonuses can also help you with the Wisdom Monument game:
| Name | Bonus | From |
|---|---|---|
 Rock Smart |
After much thought, this schematic has decided to give +20% Monument AFK gain, and +2 Starting Attempts for the Wisdom Story per POW 10 Wisdom Monument Hours. | Engineer Villager (The Hole) |
 Max Monument Rewards |
Monument Reward Multi now increases at the normal rate of +100% daily for 4 full days! Before this upgrade, it was only 2 days... | Hole Majik |
| Monumental Vibes | All of your Monument Bonuses are 1.25x higher! 9 out of 10 monument enjoyers recommend this bonus! | Hole Majik |
| Wisdom | If you end a round with no instamatches, you get one! Also, start with 1 more attempts! | Study |
| Measure | +% Monument Afk Rate | Measure |
Minecraft Gem |
+20% Monument AFK Gain rate. | The Jar |
The Gambit - Cavern XIV

The Gambit is an area where you face off against 6 different Gambit Opponents in a round of Summoning.
Each Gambit has different rules for the battle, and you gain Gambit Points the longer you last.
Your Gambit Points are based on your best survival time:
- 100 points per second of survival
- +300 points every 10 seconds
- +1,000 points every 1 minute
Based on the total amount of Gambit Points you have earned, you'll also unlock account-wide bonuses.
| Name | Rules |
|---|---|
| King's Gambit | |
| Horsey's Gambit | You have 1 HP |
| Bishop's Gambit | Damage done to your opponent is also done to you |
| Queen's Gambit | |
| Castle's Gambit | |
| Noob's Gambit | Only white essence familiars |
The following bonuses can be unlocked once you reach a total Gambit Point score:
| Bonus | Gambit PTS Required |
|---|---|
| +x Summoning Doublers | 3,000 |
| 1 Opal per POW 10 points | 5,024 |
| +20% Flurbos per Party Member | 8,667 |
| +% Resources from Caverns | 14,802 |
| +20% Upgrade Stone Success | 24,684 |
| x Essence Gain | 40,109 |
| 35% chance for 2x Ribbon Combine | 63,623 |
| x Coins from Monsters | 98,804 |
| x gains from Clickers | 150,655 |
| +1 Trim Slot and +100 WIZ Max LV | 226,126 |
| 2x Extra Snail Mail Every Day | 334,827 |
| x Ninja Stealth | 489,985 |
| 2x Extra Bones on Deathbringer | 709,731 |
| 2x Daily Particle Bubble UPG | 1,018,828 |
| % Spelunking EXP Gain | 1,450,980 |
| +% Research AFK Gains Rate | 2,051,925 |
| World 7 Bonus | 2,883,555 |
| World 7 Bonus | 4,029,397 |
| World 7 Bonus | 5,601,913 |
Gambit Bonuses
These bonuses can also help you with the Gambit game:
| Name | Bonus | From |
|---|---|---|
 Horsey Gambit |
Unlocks the Horsey challenge in the Gambit cavern. | Engineer Villager (The Hole) |
 Bishop Gambit |
Unlocks the Bishop challenge in the Gambit cavern. | Engineer Villager (The Hole) |
 Queen Gambit |
Unlocks the Queen challenge in the Gambit cavern. | Engineer Villager (The Hole) |
 The Sicilian |
+10% Total Gambit Score | Engineer Villager (The Hole) |
 Castle Gambit |
Unlocks the Castle challenge in the Gambit cavern. | Engineer Villager (The Hole) |
 Noob Gambit |
Unlocks the Noob challenge in the Gambit cavern. | Engineer Villager (The Hole) |
| Wisdom Stats | +% Gambit Points | Wisdom Monument |
Deep Blue Square |
+1% Gambit PTS | The Jar |
Murky Fabrege Egg |
+1% Gambit PTS | The Jar |
The Sactum Temple

The Temple is where Ancient Golem mobs spawn; when they are defeated, they'll drop a Green Torch item that is auto-consumed.
You can then use your Torch Points to either:
- Illuminate
- Search
- Amplify
Illuminate increases the chance of Search working.
Search will give you a % chance to awaken the Centurion, the boss of the Temple. The Centurion spawns with lots of HP and once defeated, you'll earn +1 Opal and the chance to Search is decreased, making it harder to summon the next Centurion.
The Ancient Golem mob also drops the Dragon Statue item for the Statue Man.
Temple Bonuses
These bonuses can also help you with the Temple game:
| Name | Bonus | From |
|---|---|---|
 Sanctum of LOOT |
+20% Drop Rate for each Sanctum of Ancient Golems you've cleared! | Engineer Villager (The Hole) |
 Sanctum of EXP |
+40% Class EXP for each Sanctum of Ancient Golems you've cleared! | Engineer Villager (The Hole) |
 Sanctum of DMG |
+100% Total Damage for each Sanctum of Ancient Golems you've cleared! | Engineer Villager (The Hole) |

Discussion