 DigitalTQ

Deathbringer was one of the first Masterclasses released for IdleOn and can advance from the Blood Berserker class. Deathbringer allows you to turn on Wraith mode, where you'll be able to hunt for a new Bone currency that you can spend on various upgrades.
Death Bringer is significantly one of the easier Masterclasses and very simple to master, especially now that World 7 has been released.
Job Advance to Deathbringer

To advance to Deathbringer, you need to take your Blood Berserker class to see Masterius in World 6: Troll Playground. Here you'll begin the short Masterclass Questline.
Your task is to defeat 25 different mobs from all of the worlds in IdleOn.
Simply start from World 1, kill one mob and make your way through all the different maps. Or if you can simply head to the World 1 and World 2 Colosseums as they spawn around 15 mobs each.
Once all 25 defeated, head back to Masterius to advance!
Deathbringer Overview
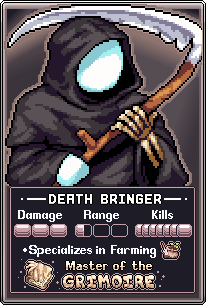
- Class Name: Death Bringer / Deathbringer
- Job Advancement: Beginner / Warrior / Barbarian / Blood Berserker / Deathbringer
- Family Bonus: +% Total Damage
- Support Talents: Farming
- Release Date: January 2025
Deathbringer allows you to farm bones from any mob in IdleOn. To collect bones, you must be in Wraith mode (use the Talent: Wraith Form).


There are four different types of Bones that drop, with each mob in IdleOn dropping a different type. Use the AFK window to see what bone it will drop.
- Femur
- Ribcage
- Cranium
- Bovinae
The rate of Bones you collect can be boosted by several different sources within IdleOn (see below).


Initially, you'll need to actively farm bones in order to get them. However, the new Charred Bone system allows this class to be played fully AFK once unlocked.
Deathbringer Damage And Stats
When Deathbringer is in Wraith Mode, damage is only affected by The Grimoire upgrades and Deathbringer Talents. That means all your weapon equipments and bonus stats from other sources do not affect your damage.
This also means your Accuracy and HP will be super low when you first start out with Deathbringer.
Luckily, there are lots of different damage-boosting upgrades in The Grimoire.
The Grimoire
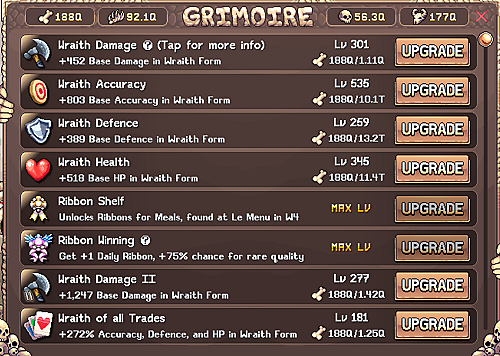
The Grimoire is a talent you can assign to your Attack bar, which will then open up a new upgrade menu where Deathbringer can spend it's new bones currencies.
Some of the most important upgrades include:
- Unlocks Ribbons for Cooking
- +1 Daily Ribbons for Cooking
- +10 Land Ranks for Farming
- +25 Opals for The Caverns
- x higher Crop Evo Chance for Farming
- x higher bonuses from The Tome
- x higher bonuses from Crop Scientist (Farming)
- +% Class EXP Bonus for all characters
- +20 Max Level for Cooking Meals
- x Villager EXP for The Caverns
- +% Total Damage for all characters
- +30 Max Talent Levels for all characters
- +% Drop Rate for all characters
- + Talent Points for all Masterclasses (including Royal Guardian!)
- +% cheaper Atom Upgrades
Once you get to End-Game status for Deathbringer, you can get a whopping +500% Item Drop Rate!
Deathbringer New Talents


Your new Deathbringer comes with several new attacks that you'll want to learn to use correctly.
The most important of these is the Graveyard Shift tombstone talent. This talent will spawn a bunch of mobs called a Horde; defeat them all and you'll get a temporary boost to Bones found. This talent also gives a massive respawn rate boost (+500% at level 677!).
You can then combine killing Hordes with Detonation; whenever you defeat a Horde there is a chance to trigger a Combustion explosion, which hits mobs near you based on the talent level of Combustion (Blood Berserker talent).


Deathbinger also unlocks the Ribbon system for Cooking and also has several skill-based talents that affect Farming, a new damage multiplier for all your other characters and a new +% Gold Food effect bonuses.
Deathbringer Talents
Deathbringer get's 1 Talent Point for it's Masterclass per level up. (You can also get talent points from other sources, see below).
Below you can find all the Deathbringer Talents the class has:
| Talent | Description | Type |
|---|---|---|
Wraith Form |
Enter/Exit Wraith Form to collect Bones from mobs, while coping with new combat stats. Also gives +% Wraith DMG | Assign |
 Grimoire |
Opens the Grimoire, which upgrades Wraith Form and much more. Also gives a passive +% boost to Bones found | Assign |
Sentinel Axes |
All axes are now +% bigger and hits x more mobs. You also throw axes every basic attack. | Passive |
Graveyard Shift |
Spawns a Horde. When killed, respawns and boosts Bones found by +%. Also normal mobs respawn +% faster. | Assign |
 Detonation |
% chance to trigger a combustion explosion when defeating a horde. Also, +% large combustion range | Passive |
 Marauder Style |
+% Wraith DMG and Accuracy per 100 Grimoire Upgrades total | Passive |
 Bulwalk Style |
+% Wraith Defence and HP per 100 Grimoire Upgrades total | Passive |
 Famine O' Fish |
+% Wraith Crit Chance, and +% Wraith Crit DMG, per POW 10 Fishing Efficiency | Passive |
 Built Different |
+ base STR | Passive |
Ribbon Winning |
There's a % chance to get an extra ribbon every day! Works for all players of course. | Passive |
Mass Irrigation |
x Crop Evo chance. Also, instagrows give 2x more growth for selected crop, and also grow all crops above and below! | Passive |
 Agricultural 'Preciation |
+% Farming EXP and +% Land Rank EXP gain. Works on all characters! | Passive |
Dank Ranks |
All bonuses in Land Rank Database give a x higher bonus! | Passive |
 Wraith Overlord |
+% DMG MULTI for all characters per POW 10 wraith bones ever collected. | Passive |
 Apocalypse Now |
+% Gold Food Effect for every monster you kill 1 billion times on this class. Bonus works for all players! | Passive |
The Grimoire Upgrades
The Grimoire talent allows you to open the upgrade shop for Deathbringer, where you spend any Bones you've collected.
To unlock each upgrade, you are required to have a cumulative total of upgrades from previous ones.
| Upgrade | Description | Max Level | Bones Required | Upgrades Required |
|---|---|---|---|---|
 Wraith Damage |
+ Base Damage in Wraith Form | 999999 | Femur | 0 |
 Wraith Accuracy |
+ Base Accuracy in Wraith Form | 999999 | Femur | 1 |
 Wraith Defence |
+ Base Defence in Wraith Form | 999999 | Femur | 5 |
 Wraith Health |
+ Base HP in Wraith Form | 999999 | Femur | 10 |
 Ribbon Shelf |
Unlocks Ribbons for Meals, found at Le Menu in W4 | 1 | Femur | 25 |
 Ribbon Winning |
Get +1 Daily Ribbon, +% chance for rare quality | 50 | Femur | 26 |
 Wraith Damage II |
+ Base Damage in Wraith Form | 999999 | Femur | 80 |
 Wraith of all Trades |
+% Accuracy, Defence, and HP in Wraith Form | 999999 | Femur | 125 |
 Wraith Destruction |
+% Total Damage in Wraith Form | 999999 | Femur | 155 |
 Land Rank Database Maxim |
+ Max LV for 5th column Land Rank upgrades | 10 | Femur | 190 |
 Wraith Crits |
+% Crit Chance in Wraith Form | 40 | Femur | 220 |
 Pure Opals |
+ Opals to give to your Villagers in World 5 | 25 | Ribcage | 255 |
 Wraith Accuracy II |
+ Base Accuracy in Wraith Form | 999999 | Femur | 290 |
 Knockout! (#) |
+% Wraith DMG per KO! | 999999 | Ribcage | 330 |
 Sacrifice of Harvest |
x higher Crop Evo chance | 999999 | Femur | 380 |
 Wraith Defence II |
+ Base Defence in Wraith Form | 999999 | Ribcage | 425 |
 Wraith Damage III |
+ Base Damage in Wraith Form | 999999 | Ribcage | 470 |
 Grey Tome Book |
x higher bonuses from the Tome | 150 | Ribcage | 500 |
 Femur Hoarding |
+% Wraith DMG per POW 10 Femurs owned | 999999 | Ribcage | 550 |
 Wraith Health II |
+ Base HP in Wraith Form | 999999 | Ribcage | 650 |
 Wraith Strikeforce |
+% Crit DMG in Wraith Form | 999999 | Ribcage | 770 |
 Elimination! (#) |
+% Wraith DMG per elim! | 999999 | Ribcage | 900 |
 Superior Crop Research |
x higher bonuses from the Crop Scientist | 200 | Femur | 1050 |
 Bones o' Plenty |
+% Extra Bones | 999999 | Ribcage | 1250 |
 Skull of Major Experience |
+% Class EXP bonus for all characters, always! | 999999 | Ribcage | 1475 |
 Wraith Accuracy III |
+ Base Accuracy in Wraith Form | 999999 | Cranium | 1700 |
 Supreme Head Chef Status |
+ Max LV for all Meals. Go max them! | 20 | Ribcage | 1900 |
 Ribcage Hoarding |
+% Wraith DEF per POW 10 Ribcages owned | 999999 | Femur | 2150 |
 Wraith Destruction II |
+% Total Damage in Wraith Form | 999999 | Ribcage | 2300 |
 Villager Extraciricular |
x Villager EXP gain in World 5 | 999999 | Cranium | 2500 |
 Wraith Defence III |
+ Base Defence in Wraith Form | 999999 | Cranium | 2800 |
 Annihilation! (#) |
+% Wraith DMG per stack! Target:$ | 999999 | Cranium | 2900 |
 Talents for Me, not for Thee |
+ Talent PTS for the Death Bringer class only | 200 | Cranium | 3150 |
 Wraith Damage IV |
+ Base Damage in Wraith Form | 999999 | Cranium | 3300 |
 Wraith Health III |
+ Base HP in Wraith Form | 999999 | Cranium | 3500 |
 Skull of Major Damage |
+% Total DMG bonus for all characters, always! | 999999 | Cranium | 3750 |
 Writhing Grimoire |
x higher bonuses from most Grimoire upgrades | 50 | Ribcage | 4100 |
 Wraith Accuracy IV |
+ Base Accuracy in Wraith Form | 999999 | Cranium | 4200 |
 Wraith of all Trades II |
+% Accuracy, Defence, and HP in Wraith Form | 999999 | Bovinae | 4500 |
 Skull of Major Talent |
+ Talent LVs for all characters, always! | 30 | Bovinae | 4600 |
 Wraith Defence IV |
+ Base Defence in Wraith Form | 999999 | Bovinae | 4800 |
 Cranium Hoarding |
+% Wraith Accuracy per POW 10 Craniums owned | 999999 | Bovinae | 5000 |
 Wraith Health IV |
+ Base HP in Wraith Form | 999999 | Bovinae | 5200 |
 Wraith Destruction III |
+% Total Damage in Wraith form | 999999 | Bovinae | 5400 |
 Skull of Major Droprate |
+% Drop Rate bonus for all characters, always! | 999999 | Bovinae | 5600 |
 Ok fine, Talents for Thee too |
+ Talent PTS for all other Master Classes | 999999 | Bovinae | 5850 |
 Wraith Damage V |
+ Base Damage in Wraith Form | 999999 | Cranium | 6200 |
 Wraith Accuracy V |
+ Base Accuracy in Wraith Form | 999999 | Cranium | 6500 |
 Bovinae Hoarding |
+% Extra Bones per POW 10 Bovinae owned | 999999 | Cranium | 6800 |
 Wraith Defence V |
+ Base Defence in Wraith Form | 999999 | Bovinae | 7100 |
 Wraith Destruction IV |
+% Total Damage in Wraith Form | 999999 | Bovinae | 7200 |
 Death of the Atom Price |
All Atoms are +% cheaper to upgrade | 999999 | Bovinae | 7500 |
Deathbringer Guide
Unlike other Masterclasses, with Deathbringer you have complete freedom of what map to choose first. However, you'll want to start right at the beginning in Blunder Hills anyway because your Deathbringer damage and accuracy will be super low.
Your main aim for Deathbringer is to obtain the 1,000 Charred Fragments. When in Wraith Form, they drop from any mob.
Getting 1,000 will unlock the Charred Bone. You'll gain 1 Charred Bone for every hour you're AFK on your Deathbringer.
When the Charred Bone is consumed, it gives you 1-hour worth of bones to spend based on your AFK rate (check the AFK window) of the map you're currently in. When you get to this point, it makes Deathbringer an easy AFK class, and will be a lot faster to progress.
Note that you only gain Charred Bone items every hour of AFK of fighting- that means if you AFK doing a skilling action, you won't get the Charred Bones.
Early Game Progression

Worlds: 1-3 (Blunder Hills, Yum-Yum Desert, Frostbite Tundra)
Starting out, you'll want to be levelling your Grimoire upgrades to increase Base Damage, HP, Accuracy and Defence. Since your stats are all essentially reset, this will be slow going in the beginning.
The first 13 Grimoire upgrades all require Femur (the first bone type). A good early-farming spot for Femurs is Valley Of The Beans and The Base Of The Bark.
If you're limited on Deathbringer Talent Points, you'll want to put talent points into the following:
- Wraith Form (+100)
- Grimoire (+1)
- Sentinel Axes (+100)
- Graveyard Shift (MAX)
- Detonation (100)
- Marauder Style (+100)
- Bulwark Style (+1)
- Famine O' Fish (+100)
Your main progression-talent is going to be your Graveyard Shift (which increases bone rates and respawn rate of mobs). You'll want to add +100 points into Sentinel Axes for damage-dealing and Detonation.
Famine O' Fish gives you Critical Chance and Critical Damage based on Fishing Efficiency stat; if you have a lot of this already on your Deathbringer, it's worth adding a decent amount of Talent Points early on into it.
Whilst Grimoire does give extra bones, the amount isn't great compared to the amount of Talent Points you have to spend on it. At level 639, it only gives +100% boost. It's only worth investing in if you have a super-high level Deathbringer.
If you're struggling with Accuracy, the Marauder Style talent is worth investing in. You get +% Damage and Accuracy based on the number of Grimoire Upgrades you have.
At some point, you'll also unlock the Knockout upgrade in the Grimoire. This gives you a damage stack for each mob you get a successful knockout on, which is basically unequipping your weapon and killing the mob in one-hit. You have to kill mobs in order however, so if you have the damage, start working on all the World 1 mobs early on.
Mid-Game Progression

Worlds: 4,5 (Hyperion Nebula, Smolderin' Plateau)
By now, you should have unlocked your AFK Bones (Charred Bone). You can now skip most of this progression-guide by simply AFKing and using your Charred Bones to get enough Bones to get you to end-game.
However, if you're actively playing Deathbringer and want to get to World 6 faster, then follow on.
The most important stats that will slow you down in mid-game is going to be Accuracy and Damage. You only want to be farming bones on maps you can 100% hit and mostly 1-shot.
The Grimoire offers several accuracy upgrades that you should focus on:
- Wraith Accuracy (Femurs)
- Wraith of All Trades (Femurs)
- Wraith Accuracy II (Femurs)
- Wraith Accuracy III (Cranium)
- Wraith Accuracy IV (Cranium)
- Cranium Hoarding (Bovinae)
- Wraith Accuracy V(Cranium)
Cranium Hoarding is one of the best accuracy boosters, but it comes very late on in the Grimoire Upgrade list. It gives +% Accuracy based on the total amount of Craniums you have, so to make the most of it, you need to have a decent stash of Craniums in your inventory.
Cranium Hoarding also requires the final bone type: Bovinae.The earliest map you can get Bovinae is Smolderin' Plateau: Niagrilled Falls.
So you're likely stuck with farming Femurs and Cranium bones. Here are the maps for these in Worlds 4 and World 5:
Femurs
- World 4: Shelled SHores
- World 4: The Untraveled Octopath
- World 5: Naut Sake Perimeter
- World 5: The Great Mlehill
- World 5: Lampar Lake
Cranium
- World 4: Mountain Deugh
- World 4: Wurm Highway
- World 4: Cocoa Tunnel
- World 4: Flamboyant Bayou
- World 5: The Killer Roundabout
- World 5: Cracker Jack Lake
- World 5: Miner Mole Outskirts
For mid-game, hopefully your Deathbringer is now at least Level 1,000 and you've gotten several external sources of Masterclass Talent Points. You should be now aiming to max all your Deathbringer talents.
Don't forget, you can increase the Max Level of all your talents by using the World 3 Talent Library.
- Wraith Form (200)
- Grimoire (200)
- Sentinel Axes (MAX)
- Graveyard Shift (MAX)
- Detonation (MAX)
- Marauder Style (MAX)
- Bulwark Style (200)
- Famine O' Fish (200)
As mentioned Marauder Style gives both Damage and Accuracy based on the total amount of Grimoire upgrades you have. You should definitely be maxing this skill out now.
If you have Super Talent Points from Legend Talents in World 7, you can also spend these points into the bolded ones. You can reset your talent points by holding down on a talent, so don't fret about which ones to upgrade.
End-Game Progression

Worlds: 6, 7 (Spirited Valley, Shimmerfin Deep)
End-Game Deathbringer is mostly focused on World 6 (Spirited Valley). Whilst you can earn bones in World 7, the mobs in this world have such high HP that they are not worth pushing for until Deathbringer is updated with new upgrade options.
Your aim is to get to the final map of Spirited Valley and be able to one-shot Samurai Guardian. This will essentially mean you've maxed out Deathbringer so far, allowing you to farm any mob for the best bone rates.
By now, damage is going to be the only thing slowing you down. Make sure you have been progressing Knockout (+% damage per knockout), Femur Hoarding (+% damage per POW 10 of Femur bones owned), Elimination (+% damage per elimination complete), Annihilation (+% damage per annihilation).
Annihilation is the hardest one to progress (defeat 200 monsters in 60 seconds), but both Knockout and Elimination can give +10,000% damage boost when you progress them to World 6.
Max all talents and use your Super Talents on:
- Wraith Form (MAX)
- Grimoire (MAX)
- Sentinel Axes (MAX)
- Graveyard Shift (MAX)
- Detonation (MAX)
- Marauder Style (MAX)
- Famine O' Fish (MAX)
Best Maps for Deathbringer Bones
Below we've listed the best maps for farm on for Deathbringer Bones.
Also, when you consume a Charred Bone, it gives 1-hour of bones currencies based on your AFK window. To max out the AFK window, you need to be actively farming using your Deathbringer, getting as many Graveyard Shift stacks for that increased bones % rate.
TIP: You should save your Charred Bones for when there is a Multi Meritocracy week for Masterclasses. This gives you a base rate of 3x bones!
The placement of your Gravestone Shift makes a huge difference in rates.
| Map | Mob | Bone | Rate |
|---|---|---|---|
| Spirited Valley - Yolkrock Basin | Royal Eggs | Femur | 1Q |
| Spirited Valley - Chieftain Stairway | Minichief Spirits | Ribcage | 630T |
| Spirited Valley - Emperor's Castle Doorstep | Samurai Guardian | Cranium | 200T |
| Spirited Valley - Sleepy Skyline | Ceramic Spirits | Bovinae | 105T |
Deathbringer Boosts
The following boosts you can earn from other areas of IdleOn that affect Deathbringer.
Extra Boosts
These boosts can be earned from other areas of IdleOn.
| Name | Boost | From |
|---|---|---|
 Arcade (Deathbringer) |
+% Deathbringer Bones | [World 1] Arcade |
 Balloonfish (Bones) |
4x Masterclass drops (bones/dust/tachyon) | [World 1] Pet Companions |
| PAPER PINT | +% extra Masterclass drops, specifically DB's Bones, WW's Dust, and AC's Tachyons! We love our acronyms don't we! | [World 2] Alchemy |
 BONE BUBBLE |
+% Extra Dust for Deathbringers. Wait I meant Bones, since Dust is for Arcane Cultists. Wait I meant Windwalkers. | [World 2] Alchemy |
 Deadly Wrath Jewel |
+50% extra Deathbringer Bones. @ This bonus always has a 100px connection range no matter what! | [World 4] Laboratory |
| Toasty Orange | +% extra Bones for Deathbringers | [World 5] Gaming |
| The Gambit (deathbringer) | 2x Extra Bones on Deathbringer | [World 5] The Caverns |
 Glimmerchain |
1.3x Extra Deathbringer Bones | [World 6] Sneaking |
| The Emperor (Deathbringer) | x Deathbringer Extra Bones | [World 6] The Emperor |
| Merit Shop (Masterclass Talents) | +5 Talent Pts for Tab 5, for all the Classes that aren't out yet! Exciting! | [World 6] World 6 Merit Shop |
 Daily Shopping Spree |
The first x upgrades you buy each day for Masterclasses are 80% cheaper | [World 7] Legend Talents |
 Multi Meritocracy (Masterclasses) |
All masterclasses find 3x more Bones, Dust, and Tachyons | [World 7] Multi Meritocracy |
| Masterclass Research | Reduces the cost of all OG Masterclass upgrades (DB, WW, AC) by 10% every day, FOREVER! | [World 7] Research |
 Turquoise Hardhat |
x more resources dropped for all W6 Masterclasses! Bones, Dust, Tachyons, what more could you ask for? | [World 7] Spelunking |
Discussion