 DigitalTQ

The Sushi Station is an area in World 7 that allows you to cook different tiers of Sushi by combining them together. There are over 60 different Sushi to craft, with each one giving a unique account-wide bonus to all your characters in IdleOn.
The Sushi Station is located in World 7: Sushi Perimeter and once unlocked, you can access it from Shimmerfin Grove hub next to the Research Desk.
You also need to have at least one point into the Research Grid Sushi Station Linguistics J3
Sushi Station upgrades are unlocked based on your Research skill level, so you'll also need to make sure you're working on that in order to get the most out of this mechanic.
Sushi Station Overview
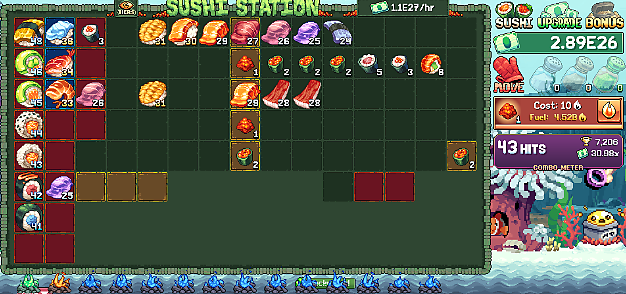
Sushi can be cooked by clicking the Fuel Gauge Fire Icon shown on the right of the Sushi Station. In the beginning you can only craft Tier 1 Sushi.
To upgrade your Sushi to the next tier, you need two of the same Sushi tier and combine them together on the Sushi Station board.
Each unique Sushi tier gives a permanent account-wide bonus and a Knowledge Bonus that affects the Sushi Station. Your Knowledge Bonus can be levelled up by combining multiple copies of the same Sushi.
Fuel is generated over time and affected by several Sushi Station Upgrades that can increase the rate it generates at.
Sushi Bucks are generated over time based on the amount of Sushi you have on your Sushi Station board. You use Sushi Bucks to increase the level of Sushi Upgrades.
You adjust your Sushi Station Board by using the Oven Mitten icon; move tiles around to best accommodate your setup.
Sushi Tier Bonuses
Below you can find all the Sushi Tiers currently available in IdleOn.
| Sushi | Tier | Description | Knowledge Bonus |
|---|---|---|---|
 Fish Eggs |
Tier 1 | 2x multiplier to Research EXP gain | +% more Bucks generated |
 Eggroll |
Tier 2 | All Minehead upgrades are 30% cheaper | +% bonus Knowledge XP |
 Egg Maki |
Tier 3 | +2 daily rolls for getting new Observations in Research | +% chance for +1 Tier for cooked sushi |
 Sashimi |
Tier 4 | +2 Research Points to buy upgrades with | +% more Bucks generated |
 Tuna Maki |
Tier 5 | +2% Research AFK gains... if you\'re at 100%, I have good news and bad news... | +% chance for +1 Tier for cooked sushi |
 Salmon Uramaki |
Tier 6 | Every new event, you get +1 play at the event game, FOREVER! | x higher Fuel Capacity |
 Salmon Maki |
Tier 7 | All Spelunk Shop upgrades are 30% cheaper | +% bonus Knowledge XP |
 Cucumber Uramaki |
Tier 8 | 1.3x artifact find chance | +% more Bucks generated |
 Cucumber Maki |
Tier 9 | +1 new magnifier to study your observations with | +% chance for +1 Tier for cooked sushi |
 Onigiri |
Tier 10 | All Summoning upgrades are 30% cheaper | +% faster Fuel generation |
 Toro Slice |
Tier 11 | All your breeding Mobs deal 2x damage when fighting | x higher Fuel Capacity |
 Toro Nigiri |
Tier 12 | 1.25x Stamina Regen Multi so you can get back to delving asap | +% more Bucks generated |
 Beef Nigiri |
Tier 13 | 1.5x multiplier to Minehead currency gain | +% bonus Knowledge XP |
 Beef Tobo Nigiri |
Tier 14 | +1 Research Point to buy upgrades | +% chance for free shaker usage |
 Tobiko Maki |
Tier 15 | Whenever you get a new ribbon, theres a 20% chance it\'s 1 tier higher | +% chance for +1 Tier for cooked sushi |
 Tobiko Temaki |
Tier 16 | 1.25x Class EXP gain | +% faster Fuel generation |
 Tobiko Cluster |
Tier 17 | All Minehead upgrades are now 50% cheaper instead of just 25% | x higher Fuel Capacity |
 Tobo Sardine |
Tier 18 | All your Exalted Stamps give a 0.01x higher bonus than before | +% more Bucks generated |
 Tobo Twins |
Tier 19 | 1.2x extra coins dropped by monsters | +% cheaper upgrades |
 Live Squid |
Tier 20 | +1 Legend Talent Point. Sponsored by Whallamus. | x higher Fuel Capacity |
 Live Octopus |
Tier 21 | 3x Spelunking POW | +% chance for +1 Tier for cooked sushi |
 Calamari Ring |
Tier 22 | +3% grand discovery chance per Spelunking LV | +% chance for free shaker usage |
 Bluefin Ring |
Tier 23 | Unlocks a new Atom, which boosts Bucks gained | +% bonus Knowledge XP |
 Tobo Tamago |
Tier 24 | All your Prisma Bubbles give a 0.01x higher bonus than before | +% faster Fuel generation |
 Tako Sashimi |
Tier 25 | +2% Research AFK gains | +% more Bucks generated |
 Hamachi Sashimi |
Tier 26 | 1.3x Burger. | +% cheaper upgrades |
 Fat Tuna Sashimi |
Tier 27 | All Sushi Station upgrades are 25% cheaper | +% chance for +1 Tier for cooked sushi |
 King Beef Sashimi |
Tier 28 | All Spelunk Shop upgrades are now 50% cheaper instead of just 25% | x faster Fuel generation |
 Salmon Sashimi |
Tier 29 | 2x more Amber gained from Spelunking, time for new Biggest Hauls! | x higher Fuel Capacity |
 Salmon Nigiri |
Tier 30 | 2x bits gained from Gaming | +% chance for free shaker usage |
 Fried Bass Nigiri |
Tier 31 | +1 maximum possible roll when rolling for new Observations | +% bonus Knowledge XP |
 Seasoned Bass Nigiri |
Tier 32 | 1.5x higher odds of getting new crowns for the Rat King in Gaming | +% cheaper upgrades |
 Jumbo Shrimp |
Tier 33 | 2x more Stealth for all your Ninja Twins in Sneaking | +% more Bucks generated |
 Aged Shrimp Nigiri |
Tier 34 | Get +3 more Exotic Market purchases at the start of each week | +% faster Fuel generation |
 Tempura Shrimp |
Tier 35 | All Summoning upgrades are now 50% cheaper instead of just 25% | +% bigger effects from Slots |
 Ika Sashimi |
Tier 36 | 2x higher farming Evo chance, to get new crop types with | +% chance for +1 Tier for cooked sushi |
 Abalone Sashimi |
Tier 37 | +1% Hat Rack multi | x faster Fuel generation |
 Aji Sashimi |
Tier 38 | 1.4x extra coins dropped by monsters | +% chance for free shaker usage |
 Aji Aji Sashimi |
Tier 39 | All Upgrade Vault upgrades are 25% cheaper | +% cheaper upgrades |
 Bubba Grand Salmon |
Tier 40 | Bubba now produced 2x more Meat Slice. Business is BOOMING! | x higher Fuel Capacity |
 Tobiko Roll |
Tier 41 | Get +1 more Tiny Cogs every day. You do have them unlocked by now right? | +% bonus Knowledge XP |
 Spicy Tuna Roll |
Tier 42 | 2x multiplier to all Sigil EXP gains | +% bigger effects from Slots |
 Salmon Uramajor |
Tier 43 | 1.2x higher Palette Luck in Gaming | +% faster Fuel generation |
 Sesame Salmon Muramajor |
Tier 44 | 1.5x Lab EXP gain | +% bigger effects from Fireplaces |
 Dragon Roll |
Tier 45 | All Sushi Station upgrades are now 50% cheaper instead of just 25% | +% chance for +1 Tier for cooked sushi |
 Imaginei Dragonroll |
Tier 46 | All your Sailing Captains earn 1.25x more personal EXP than before | x faster Fuel generation |
 Dragon Nigiri |
Tier 47 | Generate 1.3x more Divinity PTS for Divinity | +% chance for free shaker usage |
 Tamago Nigiri |
Tier 48 | All Upgrade Vault upgrades are now 50% cheaper instead of just 25% | +% bigger effects from Slots |
 Unagi Nigiri |
Tier 49 | 1.1x Drop Rate | x higher Fuel Capacity |
 Soylent Nigiri |
Tier 50 | 1.1x Total DMG | x higher chance to Perfecto all sushi |
 Masago |
Tier 51 | +10% Bonus Ballot Multiplier | +% cheaper upgrades |
 Masago Temaki |
Tier 52 | +10% Meritocracy Bonus Multi | +% bigger effects from Fireplaces |
 Masagoroll |
Tier 53 | 1.5x chance for \'Blue Chest\' Monument Rewards | +% bigger effects from Slots |
 Caviar Supreme |
Tier 54 | 1.01x bonuses from ALL Research upgrades | x higher chance to Perfecto all sushi |
 Dulce Vitiri |
Tier 55 | +1% Gallery Bonus Multi | x higher Fuel Capacity |
 Wasabaisamarama |
Tier 56 | 1.25x Megacrop Growth Chance for getting more Farming Stickers | +% chance for free shaker usage |
 Kraken Roll |
Tier 57 | +2 Opals for your Villagers | +% bigger effects from Slots |
 Leviathan Roll |
Tier 58 | 1.3x extra Treasure found from opening Sailing Chests | x faster Fuel generation |
 Golthulu Roll |
Tier 59 | +10 Max Build LVs for all Shrines in Construction | none |
Wasomber Nigiri |
Tier 60 | +10% chance for an additional Orblet stack to drop on Royal Guardians! | none |
Leek Nigiri |
Tier 61 | +30% Resource Collection Rate for all your Royal Guardian outposts! | none |
Atomiroll |
Tier 62 | Regal Intervention spawns +2 more Regal Mobs than normal when triggered | none |
Octolingo |
Tier 63 | +10% drop chance for Marble for your Royal Guardian | none |
Sushi Upgrades
Below you can find all the upgrades available for the Sushi Station. They require Sushi Bucks to level up and Research Level to unlock.
| Upgrade | Description | Max Level | Research Required |
|---|---|---|---|
 Hourly Wage Meter |
Adds a display to the Top Right of the Sushi Station which shows total Hourly Bucks generated by all your sushi. Also, +1% total Bucks generated by all sushi! | 9999 | 1 |
 Fastburn Fuel I |
+15% faster Fuel generation | 9999 | 6 |
 Sushi Service Bonuses |
Creating a new sushi type gives a new IdleOn bonus for the REST of the game! Check them out in the BONUS tap, top right corner. | 1 | 11 |
 Fuel Capacity I |
+50 max Fuel Capacity! | 9999 | 15 |
 Customer Surcharge I |
All your sushi generate Bucks based on their tier. Higher tier sushi generate way more! This upgrade boosts all Bucks generated by +2% | 9999 | 19 |
 Fastburn Fuel II |
+100% faster Fuel generation, and a unique x Fuel Generation multi bonus! | 9999 | 21 |
 Sushi Slot |
Adds a new slot for your Sushi Station! | 50 | 24 |
 Superior Sushi Skillz |
You can now click the Sushi on your fuel bar to change which sushi you cook, up to Tier X. This also increases fuel cost. | 35 | 26 |
 Fuel Capacity II |
+200 max Fuel Capacity, and a unique x Fuel Cap bonus! | 9999 | 28 |
 Sushi Tier Vision |
Adds a toggle button to the Top Left of the Sushi Station. Click it to show Sushi Tiers numerically, can be turned off any time. Also, +2% total Bucks generated by all sushi! | 9999 | 29 |
 Salt Shaker |
Click to use once per day. When used, all sushi have a chance of getting a Tier Up! By default, you get +1 shaker use every day, just sayin'. | 1 | 30 |
 Customer Surcharge II |
All your sushi generate +3% more Bucks! Also, each unique sushi you create gives a 1.10x multiplicative bonus to Bucks generated, did you know that? | 9999 | 31 |
 Combo Meter |
Combining sushi adds score to the Combo Meter equal to the Tier created, but cooking new sushi OR taking too long ends the combo. Get a perma Bucks Multi based on your best combo! | 1 | 33 |
 Hot Slot |
Adds a new SPECIAL slot for your Sushi Station... the Hot Plate! Sushi on these slots generate x more Bucks! | 20 | 34 |
 Movement Mittens |
Adds the MOVE button. Enabling this option lets you drag the SLOTS themselves around your Sushi Station, instead of the sushi. | 1 | 35 |
 Seared Knowledge |
Whenever a sushi is created in any way, that sushi type gains +1 EXP. Level up sushi for unique knowledge bonuses! | 1 | 36 |
 Charcoal Fireplace |
Unlock a new Fireplace! This default red charcoal fire increases Fuel generation by +1% per Tier of Sushi in the column above it. | 15 | 37 |
 Quickpay Fee |
When a sushi is created, it instantly generates 1 minute's worth of Bucks! | 120 | 39 |
 Fastburn Fuel III |
+750% faster Fuel generation, and a unique x Fuel Generation multi bonus! | 9999 | 41 |
 Fuel Capacity III |
+1500 max Fuel Capacity, and a unique x Fuel Cap bonus! | 9999 | 42 |
 Shake N' Bake |
Whenever you use any Shaker, you instantly generate 1 hour's worth of Fuel! Also, 1% chance to get 10 hour's worth instead! | 10 | 43 |
 Customer Surcharge III |
All your sushi generate +5% more Bucks! | 9999 | 44 |
 Quality Freshness |
1% chance for freshly cooked Sushi to be +1 higher Tier! Cook T1, get T2! | 25 | 45 |
 Pepper Shaker |
Click to use once per day. When used, all sushi have a chance to be Perfecto'd, which means its Knowledge Bonus is 2x bigger! | 1 | 46 |
 Milktoast Slot |
Adds a new SPECIAL slot for your Sushi Station... the Milktoast Plate! Sushi on these slots generate + EXP/day | 12 | 48 |
 Barium Firelighter |
Fireplaces can be changed to green. Sushi above green fires generate x more Bucks. | 1 | 49 |
 Heat of the East Wind |
When a sushi is combined, it tiers-up the sushi to its right, but only if that sushi is lower tiered. This only works on sushi Tier x and lower. | 1 | 50 |
 Fastburn Fuel IV |
+5000% faster Fuel generation, and a unique x Fuel Generation multi bonus! | 9999 | 51 |
 Wholesale Pricing |
All upgrades are % cheaper, now and forever! | 9999 | 52 |
 Bottomless Shakers |
Whenever you use any Shaker, there's a 1% chance to get another usage! Free use, basically... | 20 | 53 |
 Fuel Capacity IV |
+10000 max Fuel Capacity, and a unique x Fuel Cap bonus! | 9999 | 55 |
 2nd Degree Searing |
Newly created Sushi generate + exp, instead of just +1 EXP. This is of course multiplied by all knowledge EXP multi's | 9999 | 56 |
 Copper Firelighter |
Fireplaces can be changed to blue. Sushi above blue fires have a 1% chance of getting +2 tiers instead of +1, so long as it's not your highest tier. | 1 | 57 |
 Saffron Shaker |
Click to use once per day. When used, all sushi generate 1 hour's worth of Bucks! | 1 | 58 |
 Cold Slot |
Adds a new SPECIAL slot for your Sushi Station... the Cold Plate! Sushi on these slots generate + EXP/day for ALL sushi lower tiered than this one! | 8 | 60 |
 Fastburn Fuel V |
+25000% faster Fuel generation, and a unique x Fuel Generation multi bonus! | 9999 | 61 |
 Sasaphrax Saffron |
Saffron Shaker now generates x hour's worth of Bucks, not just 1 hour! | 23 | 63 |
 Customer Surcharge IV |
All your sushi generate +10% more Bucks! | 9999 | 64 |
 Overtuned Fuel |
When you generate fuel while at max capacity, you get +1 ??? | 1 | 65 |
 Lithium Firelighter |
Fireplaces can be changed to pink. Sushi above pink fires generate x more Knowledge EXP by all methods and means of doing so! Think about it. | 1 | 66 |
 Fuel Capacity V |
+50000 max Fuel Capacity, and a unique x Fuel Cap bonus! | 9999 | 67 |
 Potassium Firelighter |
Fireplaces can be changed to purple, which each give +1 ??/sec | 1 | 68 |
 No Tax on Tips |
Multiplies all Bucks earned by x | 9999 | 70 |
 3rd Degree Searing |
Boosts all Sushi EXP gained from all sources by +1%. That includes newly created Sushi and EXP from Cold and Milktoast plates. | 9999 | 71 |
 Customer Surcharge V |
All your sushi generate +20% more Bucks! | 9999 | 72 |
Rift Guy's Upgrade |
I've got my hands in everything! Minehead, farming, the rift... so yea, of course I'm in the Sushi biz too, don't be so shocked. | 0 | 73 |
Sushi Station Tips and Tricks
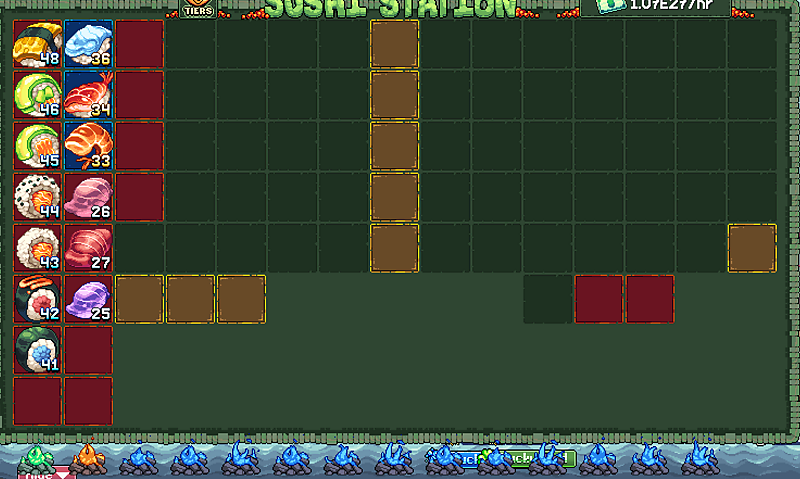
Sushi Station is all about merging lower-tier Sushi together to reach the next tier. In the beginning, you are capped by how much Fuel you can generate.
There are four key mechanics you need to be aware of:
- Slots
- Fireplaces
- Heat of the East Wind
- Shakers
- Combo Meter
Sushi Slots
Sushi Slots / Plates are different shaded tiles that give various bonuses. You unlock plates in the Sushi Upgrades menu.
You can move slots around using the giant Oven Mitten Glove icon.
There are currently four different types:
| Plate | What It Does | When To Use |
|---|---|---|
| Sushi Slot | Adds an extra tile to the board | Always be adding this to extend how many Sushi you can have, especially when going for Perfecto Sushi |
| Hot Slot | Adds red tiles to your board; any Sushi placed on these give a multi to the Sushi Bucks they generate | Keep your highest tier Sushi on Hot Slots for higher Sushi Bucks per hour |
| Milktoast Slot | Sushi placed on the Milktoast slot give Knowledge EXP per day. | The amount of EXP you get from these slots is super low and it only occurs daily. Don't invest too much into this upgrade |
| Cold Slot | Sushi placed here give Knowledge EXP per day to all tiers lower than this one | Whilst the amount of EXP is still low, at least it can affect multiple Sushi at once. If you're trying to rank up Knowledge for your lower-tier sushi, this is the plate to use. |
Your Strategy here should be to have all your highest tier Sushi on Hot Plates and then any extra put onto Cold Slots.
Put a column of Hot Slots together, because you can then combine this with Fireplaces (see below).
Sushi Fireplaces
Fireplaces appear at the bottom of the Sushi Board and can be changed to different colors (once unlocked) by clicking on them. They have the following effects:
| Fireplace | What It Does | When To Use |
|---|---|---|
| Charcoal Fireplace | Increases Fuel Generation by 1% for all the Sushi above it | Fuel Generation is key to progressing in the Sushi Station, so this is the default Fireplace you want on when AFKing. |
| Barium Fireplace | Increases the amount of Sushi Bucks generated by the Sushi above it | When aiming to level up your Sushi Upgrades, this is the Fireplace to switch to. |
| Copper Firelighter | Sushi above have a 1% chance of getting +2 Tiers instead of +1. | Use this Fireplace when you are merging Sushi together. Getting an extra Tier Up will significantly increase progression. |
| Lithium Firelighter | Sushi above the pink fireplace generate more Knowledge EXP. | Use this when going to Knowledge Levels. |
| Potassium Firelighter | Sushi above this give x/sec | Unsure |
When AFKing, you should set your best Tier Sushi to Barium for the Sushi Bucks multiplier. For any others, you set them all to Charcoal when AFKing so you can generate Fuel faster.
When you're going for Sushi Tier-Ups, you want to switch to the Copper Fireplace (Blue); when going for Knowledge switch to Lithium (pink).
When you're about to unlock a new Tier, you should switch to Lithium also for the quick Knowledge Bonus level up.
Heat of the East Wind

This is where Sushi Station starts to dramatically improve. The upgrade Heat of the East Wind unlocks at Research Level 50, so if you're not there yet, try and focus on getting more Research EXP.
Heat of the East Wind allows you to chain Sushi Tier-Ups together. It will automatically Tier Up a lower tier Sushi to the right of the Sushi you're trying to Tier Up (so the example above would tier-up all of these sushi in a row; combine this with Copper Fireplaces and you suddenly get many more tier-up boosts).
It will also give you multiple boosts to Fuel in one go, allowing you to continuously max out your Fuel Capacity.
It does have a limit however; it will only effect Sushi Tiers 5 levels lower than your max.
Sushi Shakers
Shakers are dailies that give you a specific bonuses when used. They can stack up, so if you don't use your Shakers for a particular day, the use will carry over to the next day.
To make the use of Shakers, you'll want to unlock the Research Grid Shakin' It (i3). This gives you an extra +2 use per day when maxed out.
There are four Shakers you can unlock through the Sushi Upgrades:
| Shaker | Effect | When To Use |
|---|---|---|
| Salt Shaker | Has a chance to give all your Sushi on the board a +1 Tier Up | Since Tier Ups also generate Fuel, it's best to use a Shaker when your Fuel is at 0 so you can replenish it. |
| Pepper Shaker | Has a chance to Perfecto a Sushi | Perfecto'd Sushi have their Knowledge Bonus doubled. You should use this when your entire Sushi board filled with a Sushi you need to Perfecto'd |
| Saffron Shaker | Generates 1 hours worth of Sushi Bucks | Honestly, not the best Shaker so probably best to use this when you get low on Fuel (as you do generate Fuel with this Shaker too). |
You'll want to Perfecto all your Sushi Tiers eventually, but it's best to start with the lowest Tier of Sushi because you'll start having Tier Up rates that make it difficult to generate the Sushi you actually want to Perfecto.
The best time to use your Pepper Shaker is when you have your board full of the highest tier of Sushi possible and have 0 Fuel left to generate. Using this will also fully recharge your Fuel (usually).
Combo Meter

The Sushi Combo Meter is a new feature introduced in patch V1.21.
The Combo Meter gives a multiplicative bonus to Sushi Bucks generated. Each time you combo a Sushi Tier, the Combo Meter increases.
The Combo Meter also has a timer- as soon as you make your first tier-up, you'll have around 8 seconds to make the next tier up to increase the combo and reset the timer.
Your highest Combo Meter score stays permanent.
Discussion